Earth Systems Science, Inc.
Soil Texture by Sedimentation Bottle Notes
Introduction
Use this method to get a more detailed soil texture classification of your soil sample than the hand test methods demonstrated in class. This method uses more measurement, calculation, and a standard reference (the soil texture triangle).
Materials / Equipment
--1 empty bottle (smooth straight sides are ideal) with cap
--1 tablespoon (don't use this for food)
--Powdered dish detergent (non-sudsing)
--clean water (enough to fill the bottle)
--watch or clock
--pen / pencil and paper
--calculator
--A dried, crushed, soil sample
Procedure:
Step 1. Dry the sample thorough by spreading it in a thin on newspaper in the sun for a day or so. You will it is dry when it ''jumps'' on the newspaper when you pick it up and shake it. You can hear the soil particles ''rattle'' on the paper.
Step 2. Crush the sample by laying the dried soil sample down on a flat surface. Spread it out thinly again. Put another layer of newspaper over it. Then crush the soil sample. Use an old rolling pin, an old piece of pipe or an empty bottle.
Step 3. Pour the dried and crushed soil sample into an empty plastic bottle. Ideally the bottle should have smooth straight sides. This will make it easier to measure the sedimentation results.
Step 4. Add 1 tablespoon of powder dish detergent (non-sudsing). This contains a surfactant (a chemical that will help keep the soil particles from sticking together).
Step 5. Add water (about 3/4 full to start), cap the bottle, and shake vigorously to mix everything thoroughly. Check to be sure no soil is clinging to the bottom of the bottle. Fill the bottle nearly to the top with water and continue to shake. Stop when everything is thoroughly mixed.
Step 6. Set the sedimentation bottle down on a level surface. Pick a place you can leave the bottle undisturbed for 2 days.
Step 7. Measure the sedimentation results according the following timetable.
Wait 1-2 minutes. Sand-sized particles will have settled out. Measure the thickness of the sand layer.
Wait 1-2 hours. Silt-sized particles will have settled out. Measure the thickness of the silt layer.
Wait 1-2 days. Clay-sized particles will have settled out. Measure the thickness of the clay layer.
Step 8. Calculate the proportions for each soil “separate” by adding the thickness of the three layers to get the total height of the sediments. Divide the thickness of each layer by the total height to get the % sand, silt, and clay of the sample.
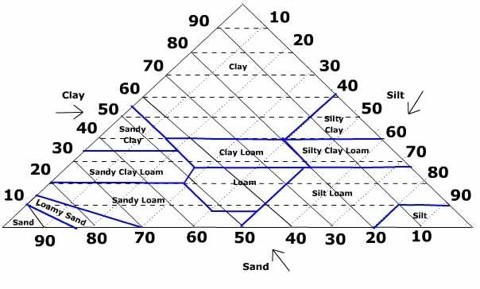
Step 9. Use the Soil Texture Triangle to estimate the soil texture classification. Sand, silt and clay are each assigned one side of the triangle. Find the % for each separate on its appropriate scale. Follow the guidelines (see the arrows in the soil texture triangle) into the chart. (Note for example, the guidelines for sand are diagonal and parallel to the right edge of the triangle. The guidelines for silt are diagonal and parallel to the left edge of the triangle. The guidelines for clay are horizontal, and parallel to the base of the triangle.)
Example: Your sample test results show 10% sand, 30% silt, and 70% clay. Following the appropriate guidelines to the point all three converge in the chart. Your sample is a Clay soil.
Links
Post a Question to the ESSI Discussion Area
Check the ESSI Calendar
Check the ESSI Newsletter
ESSI-NWF Habitat Steward Training Workshop
Soil pH Test Notes
